Part 1 of a three-part series on building an iOS App Clip on top of an existing React Native app. This part covers the design and architecture. Part 2 is the hands-on setup guide; Part 3 covers the hardest constraint: fitting React Native into Apple's ~15 MB App Clip size budget.
TL;DR
- App Clips collapse the "install-then-sign-up" funnel to a single tap — and you can build one from your existing React Native app instead of rewriting it in Swift.
- The architecture: one Xcode project, two targets, two JS entry points, a stripped-down single-screen clip shell, and one runtime seam (
isAppClip()) where shared code branches.- Scope auth to the ephemeral entry point (a link-based token, not full OAuth) — it's better UX and less binary weight to ship.
Almost every app has a moment where it needs to show something to a person who doesn't have it installed — a shared document, a parking meter, a restaurant menu, a boarding pass, an event invite. The path from "tap this link" to "see the thing" is one of the worst funnels in mobile:
tap link → App Store → download (tens of MB) → open → sign up → finally see the content.
Most people bail somewhere in the middle. The thing they were invited to see is on the other side of a wall.
App Clips are Apple's answer to that moment. An App Clip is a tiny, focused slice of your app that iOS can download and launch instantly from a URL, QR code, NFC tag, or Messages link — no App Store visit, no install step. It's ephemeral (the system can evict it), it runs in a privacy-constrained sandbox, and it exists to do one thing well, then offer the full app if the user wants more.
This series is about building one on top of an existing React Native app — reusing your codebase instead of writing a second app in Swift. Throughout, we'll use one running example to keep things concrete: an event-sharing app whose clip lets an invited guest open a shared event and browse its photos in seconds — no install, no account. But the patterns are the point, and they apply to any App Clip you'd build.
What you actually want from a clip
Whatever the domain, the goal of an App Clip is the same: collapse that funnel to a single tap. Our running example makes it tangible — sharing an event with someone who doesn't have the app used to mean the full App-Store-then-signup gauntlet, and most invitees never made it to the photos.
The design question this raises is the interesting one: your full app is big — many screens, real accounts, a pile of native dependencies — and the clip has to be the opposite: one screen, minimal auth, tiny binary. How do you get one from the other without maintaining two of everything? That's what the rest of this part is about.
The core decision: reuse the codebase, or rewrite native?
The first real decision facing any React Native team is also the biggest: rebuild the clip natively in Swift, or reuse the React Native app? Apple's own App Clip templates assume native code, so reuse is a choice you have to make deliberately.
We chose reuse, and the reasons generalize to most RN shops:
- One UI to maintain. The screen the clip shows already exists in React Native (for us, the event view — cover photo, media grid, albums). Rebuilding it in SwiftUI means two implementations of the same UI drifting apart forever.
- Shared networking and auth logic. The clip talks to the same backend as the full app. Your fetch layer, header injection, token refresh, and secure storage are already written — reuse them and the clip behaves consistently with the app by construction.
- Velocity. A small team can ship the clip as a configuration of the existing app rather than a greenfield native project.
Reuse is not free, though, and it's worth naming the cost up front: React Native brings a JavaScript runtime and a pile of native modules, while App Clips have a strict size budget. That tension — "reuse everything" vs. "fit in a tiny binary" — is the whole plot of Part 3. For now, hold the thought: the clip has to be a lean subset of the app, not a smaller copy of it.
One project, two targets, two entry points
An App Clip ships as a separate iOS target with its own bundle identifier, embedded inside the main app. We kept it in the same Xcode project as the full app so they share build settings and infrastructure:
- Main app target → bundle id
com.example.myapp - App Clip target → bundle id
com.example.myapp.Clip
On the JavaScript side, React Native apps have a single entry point (index.js) that
registers a root component. We added a second entry point for the clip:
// index.js  — the full app
import { AppRegistry } from 'react-native';
import App from './src/App';
import { name as appName } from './app.json';

AppRegistry.registerComponent(appName, () => App);
// appClip.js  — the App Clip
import { AppRegistry } from 'react-native';
import AppClip from './src/AppClip';

// The native App Clip target loads this component instead of the full App
AppRegistry.registerComponent('AppClip', () => AppClip);
Two roots, one bundle of source. The native side decides which root to mount based on which target is running.
This section is about the design; the exact Xcode steps — creating the target, pointing its
AppDelegateat theAppCliproot, and making the build bundleappClip.js— are covered step by step in Part 2: Setting Up an App Clip in React Native.
The App Clip shell is a stripped-down app
App.tsx (the full app) is a big tree: multiple navigators, tabs, dozens of screens, login
flows, deep-link routing, and so on. AppClip.tsx is deliberately tiny — just enough
scaffolding to render one thing: the shared event.
// src/AppClip.tsx (simplified)
const Stack = createNativeStackNavigator();

const AppClipNavigation = () => {
  const [loading, setLoading] = useState(true);
  const [shareDetails, setShareDetails] = useState(null);
  const { storeAuthData } = useAuther();

  const handleDeepLink = useCallback(async (url: string) => {
    // 1. Pull the invite key out of the launch URL
    const inviteKey = extractInviteKey(url);      // .../event/{eventId}/{inviteKey}
    if (!inviteKey) return setLoading(false);

    // 2. Exchange it for a token (see "lighter auth" below)
    const { token, shareUid, ownerId } = await authenticate(inviteKey);
    await storeAuthData(token, null, ownerId, null, inviteKey);

    // 3. Fetch what we need to render the event
    setShareDetails(await fetchShareDetails(shareUid, token));
    setLoading(false);
  }, [storeAuthData]);

  useEffect(() => {
    Linking.getInitialURL().then(url => url ? handleDeepLink(url) : setLoading(false));
    const sub = Linking.addEventListener('url', ({ url }) => handleDeepLink(url));
    return () => sub?.remove();
  }, [handleDeepLink]);

  if (loading) return <ActivityIndicator />;

  return (
    <NavigationContainer>
      <Stack.Navigator screenOptions={{ headerShown: false }}>
        <Stack.Screen name="EventDetails">
          {props => <EventView {...props} eventClipData={shareDetails} />}
        </Stack.Screen>
      </Stack.Navigator>
    </NavigationContainer>
  );
};
Wrapped around that is the minimum set of providers the event screen needs — theme, content,
gestures, safe area, toasts, auth. It reuses the same EventView component the full app
uses to render a shared event. Same UI, different host.
The shape here is the point: the clip is a single screen with a single job. It launches, it authenticates, it renders the event. Everything else the full app can do is intentionally absent.
Runtime branching on a shared codebase
When one codebase serves two apps, you need a way for shared code to ask "am I running inside the App Clip right now?" — so a module can behave slightly differently without forking into two copies. Find that one runtime seam and everything else can stay genuinely shared.
The check is a one-liner, keyed off the bundle id:
// src/utils/isAppClip.ts
import DeviceInfo from 'react-native-device-info';

export const isAppClip = () => {
  return DeviceInfo.getBundleId() === 'com.example.myapp.Clip';
};
This tiny function is the seam that lets one codebase serve two apps. Shared plumbing calls
isAppClip() at the exact points where the clip and the full app must diverge — and nowhere
else. The most important place it's used is auth.
A deliberately lighter auth model
Here's a principle that applies to almost every App Clip: scope authentication to the
ephemeral entry point. The full app authenticates with OAuth (via react-native-app-auth):
a browser-based login, access/refresh/id tokens, the works. That's right for a persistent app
with real accounts.
An App Clip is a different animal. The user hasn't signed up — they arrived via a link that is their credential, and they may never come back. Forcing them through a full login wall throws away the whole reason the clip exists. So the clip should authenticate with the lightest mechanism the task allows. In our running example, that's a share-based flow keyed off the invite link:
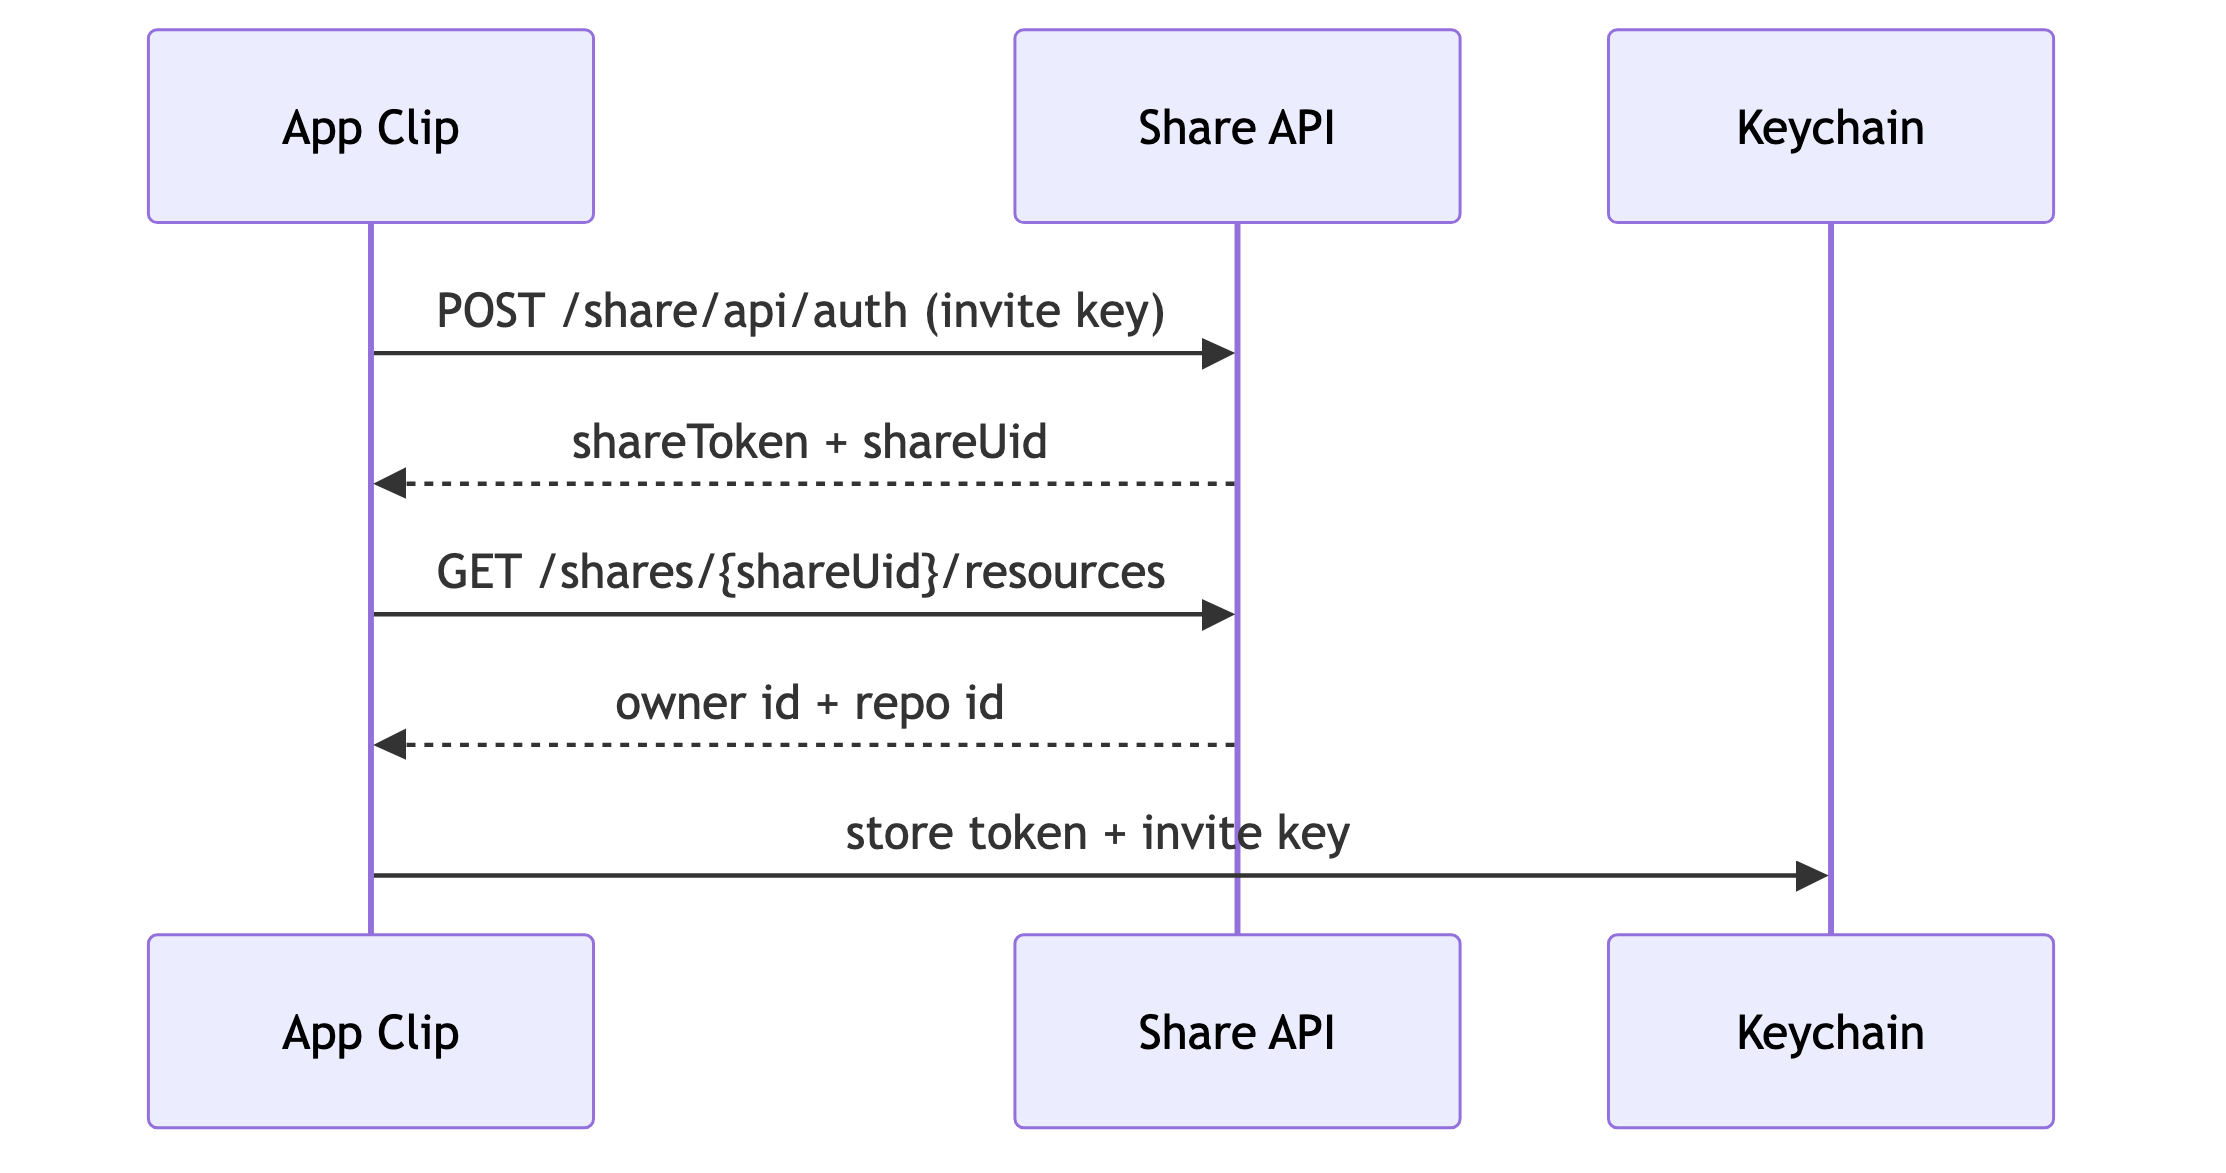
// src/utils/AppClipManager.ts (trimmed to the happy path)
export async function authenticate(inviteKey: string): Promise<AppClipAuthResult> {
  pendingInviteKey = inviteKey;                       // (see the race note below)

  // Exchange the invite key for a short-lived share token
  const { shareUid, token } = await authenticateWithInviteKey(inviteKey);
  if (!token || !shareUid) return emptyAuth(inviteKey);

  await storeAuth(token, null, null, null, inviteKey); // persist to Keychain

  // Resolve which account/repo this share points at
  const resources = await fetchResourcesForShare(shareUid, token);
  const ownerId = resources?.ownerUid ?? null;

  pendingInviteKey = null;
  return { token, shareUid, ownerId, inviteKey };
}
Two things make this a good design choice, not just a shortcut:
- It fits the ephemeral model. No sign-up wall means no drop-off. The invite link is the whole identity story.
- It saves weight. The clip doesn't link
react-native-app-authat all — one of the heavy native modules we drop to fit the size budget. Auth design and size budget are the same conversation, which is why this thread continues in Part 3.
Sharing the network layer, branching only where it matters
Here's the pattern I'm most fond of. Both apps make API calls through the same
fetchInterceptor — a wrapper around global fetch that injects auth headers, rewrites
{userId} placeholders, and transparently retries once on a 401 after refreshing the token.
The only difference between the two apps is how a token gets refreshed. So that's the only place we branch:
// src/utils/fetchInterceptor.ts (the 401 branch, simplified)
if (status === 401 && !globalThis.__refreshPromise) {
  const auth = getAuthDetails();

  globalThis.__refreshPromise = (
    isAppClip()
      ? refreshAppClipAuth()                          // re-run the invite-key exchange
      : refreshAuthToken(auth?.refreshToken, auth?.idToken)  // OAuth refresh
  ).finally(() => { globalThis.__refreshPromise = null; });
}
await globalThis.__refreshPromise;
// ...then replay the original request with the fresh token
Everything else — the header injection, the retry loop, the single-flight refresh lock so concurrent 401s don't stampede — is written once and shared. The clip inherits all of it for free. This is the "one codebase, two apps" idea in miniature: shared plumbing, one tiny, well-marked branch.
One subtle bug worth calling out
There's a race hiding in the clip's refresh path. When the clip first launches, it might fire
several API calls concurrently. If one of them gets a 401 and triggers a refresh before
the invite key has finished being written to the Keychain, the refresh has nothing to read —
and fails with "no invite key found."
The fix is a small in-memory holding variable:
let pendingInviteKey: string | null = null;   // set at the very start of authenticate()

// On refresh, look in memory first, then fall back to persisted storage:
const inviteKey = storedAuth?.inviteKey || pendingInviteKey;
pendingInviteKey bridges the gap between "we know the key" and "the key is persisted." It's
a tiny detail, but it's the kind of thing that only shows up once you have real concurrency on
a cold start — worth remembering if you build something similar.
What this bought us
- The instant-sharing UX we set out for. Tap a link, see the event in seconds, no install, no account.
- One UI codebase. The event experience is written once and rendered by both the app and the clip.
- Reused networking and auth. Header injection, refresh, and Keychain storage are shared; only the refresh strategy differs.
- A natural upgrade path. Once someone's in the clip, iOS offers a frictionless "get the full app" step — and because it's the same codebase, the experience is continuous.
If you take three things from this part, take these — they hold for any App Clip, not just ours:
- Model the clip as a single-purpose subset of the app, not a smaller copy of it. One screen, one job.
- Find the one true seam (
isAppClip()) and branch only there. Everything else stays shared. - Let the use case simplify your design. An ephemeral, link-driven clip rarely needs full OAuth — and choosing the lighter path is both better UX and less weight to ship.
From here the series splits into the two practical problems. If you want to actually stand this up — the Xcode target, entitlements, associated domains, the server-side association file, and App Store Connect — that's Part 2: Setting Up an App Clip in React Native →.
And that last takeaway — less weight to ship — is where the real engineering challenge lives. React Native is not small, and Apple's App Clip size limit is not generous. How you squeeze a React Native app under ~15 MB is the subject of Part 3: Fitting React Native into a 15 MB App Clip →.
Written by Tushar Dahiya. If this was useful, find more of my writing at tushardahiya.com — more on React Native and iOS engineering, and let me know what you'd build as an App Clip.
Code in this article is simplified and genericized for illustration; hostnames, identifiers, and credentials are placeholders.